
The complete guide
How to Choose a 15L Camera Backpack for Hiking and Travel
The problem with carrying a camera all day
Camera gear is awkward. It is heavy in a way that is hard to spread out, it is fragile in ways that are hard to predict, and the moment you most want it is usually the moment it is buried at the bottom of a bag. Anyone who has knelt on a wet trail, unclipped a pack, laid it face down in the mud and dug past a jacket to find a lens knows the feeling. By the time you are ready, the light has moved.
Most people solve this badly. Either they carry the camera on a strap around their neck all day, which gets painful inside an hour and leaves the body swinging into rocks, or they throw everything into a general hiking pack with a sweater wrapped around the lens and hope for the best. Neither is great. A dedicated camera backpack exists to fix both problems at once, giving every piece a padded home and still letting you reach it quickly.
What 15 litres actually means
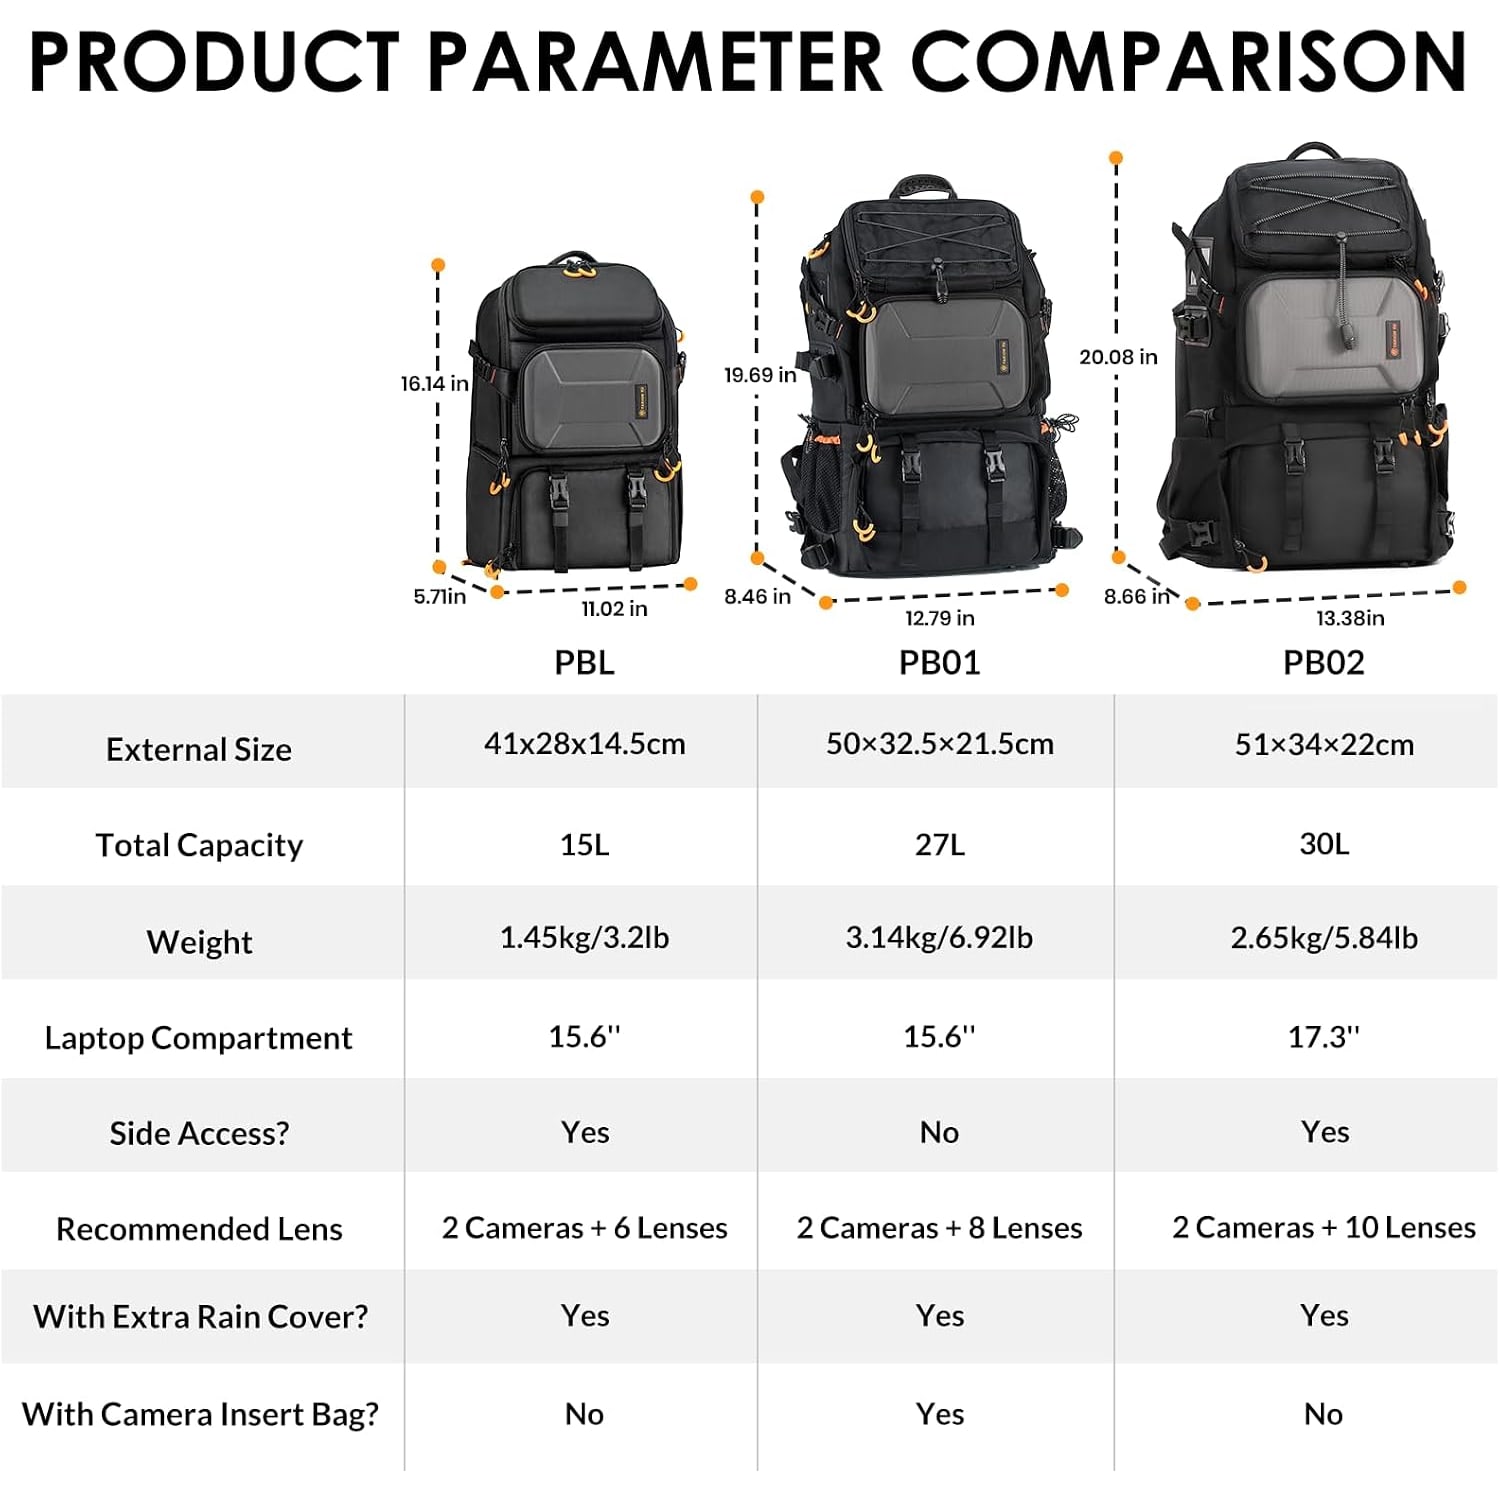
Volume numbers on bags can feel abstract, so it helps to translate. Fifteen litres is a daypack. It is the size you would take on a long walk, a day in a city, or a weekend trip where you are not carrying clothes. On this pack it works out to 5.7 inches deep, 11 inches wide and 16 inches high, which is a slim profile that sits close to your back rather than sticking out behind you.
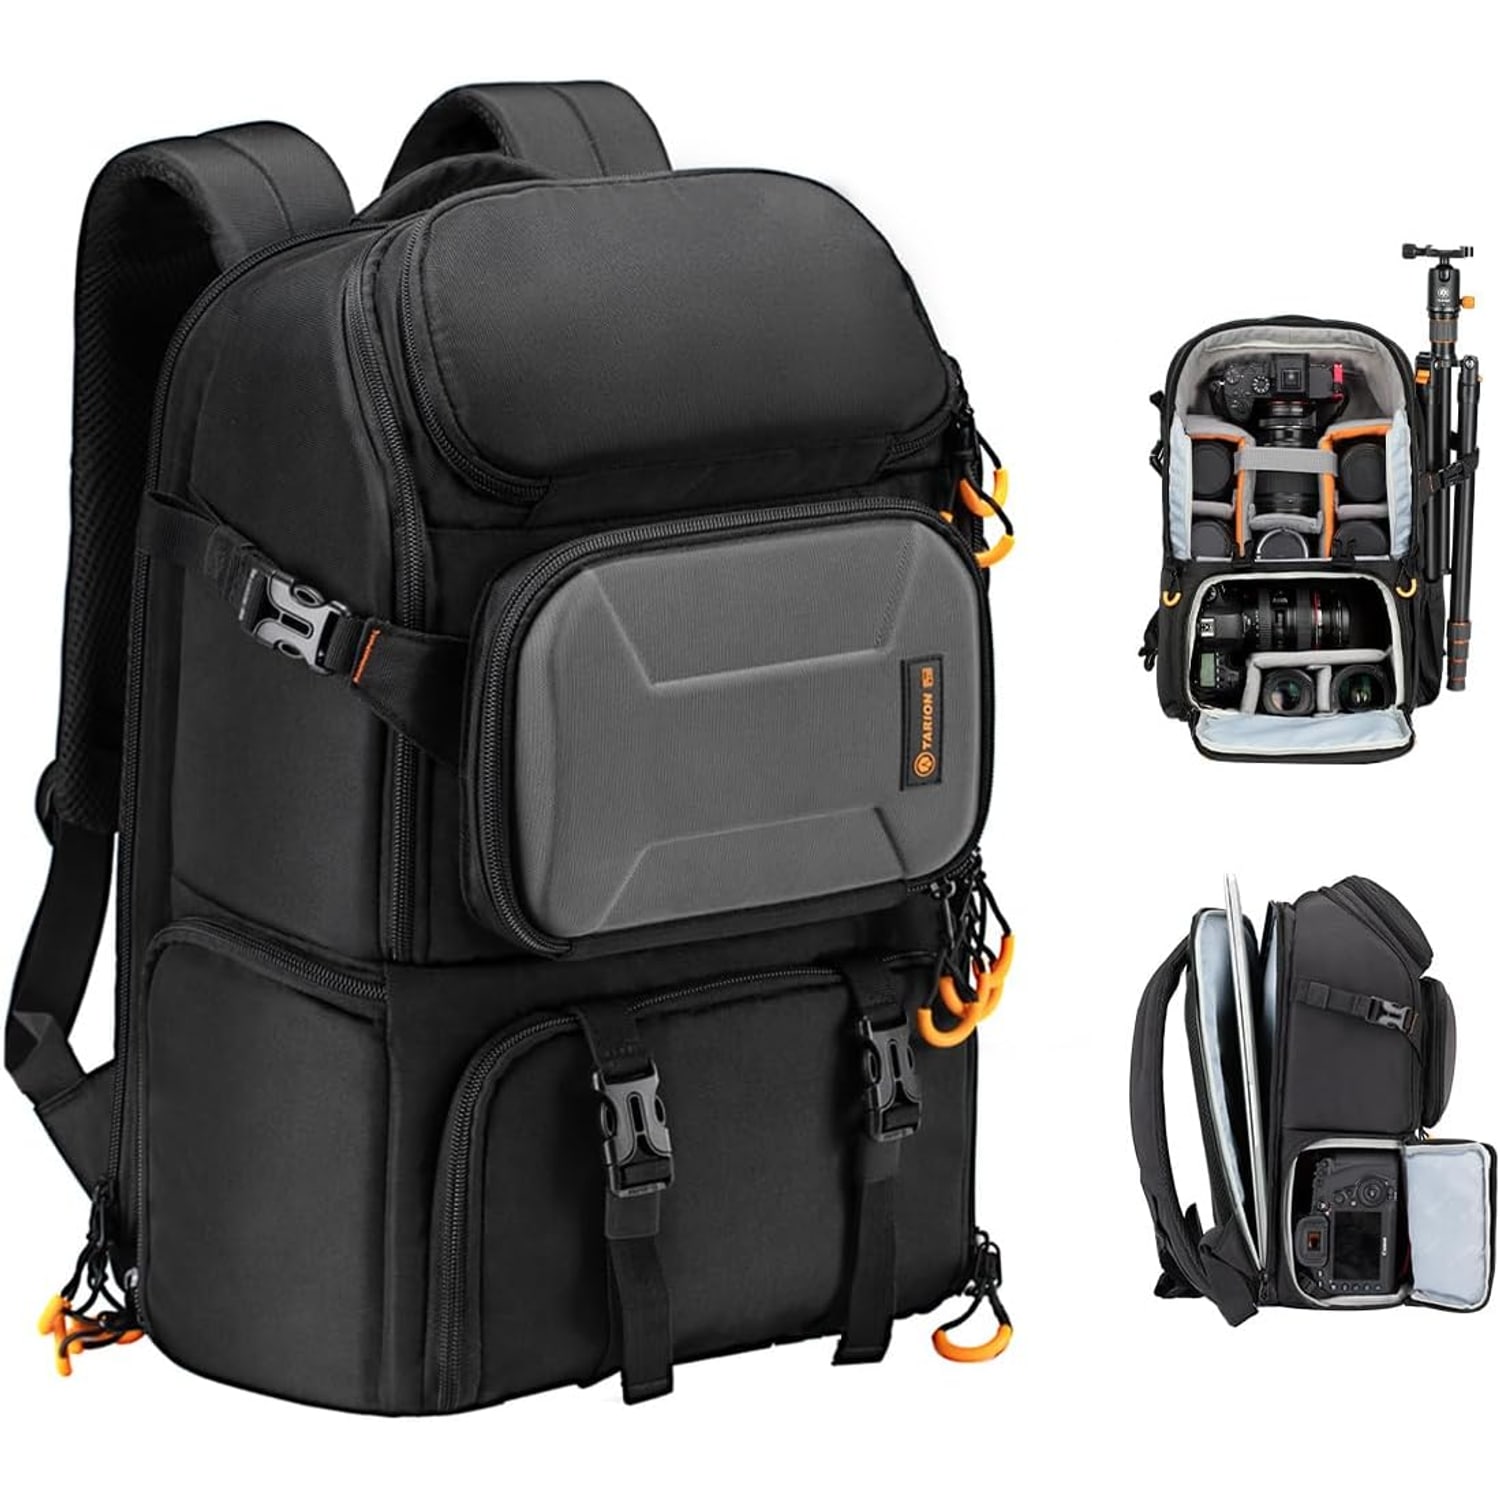
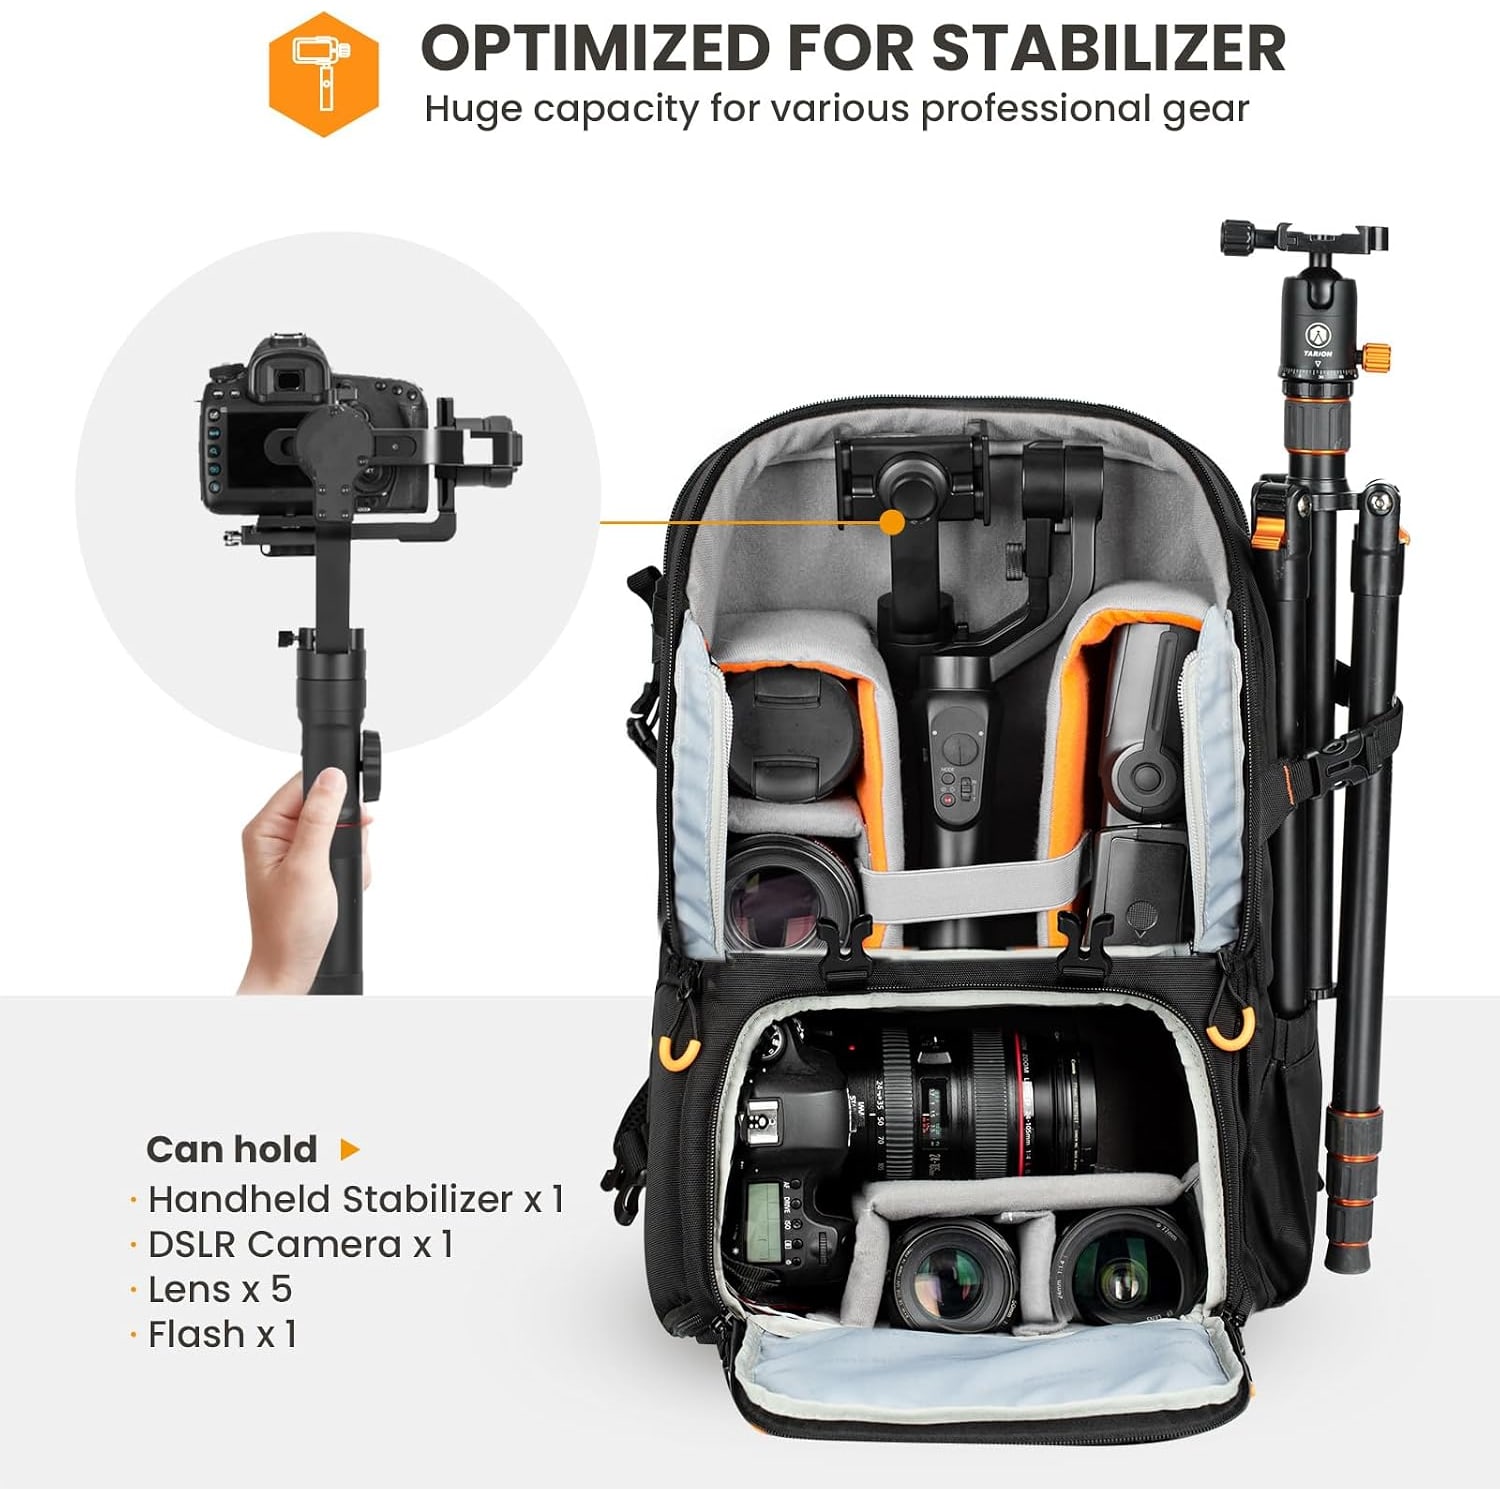
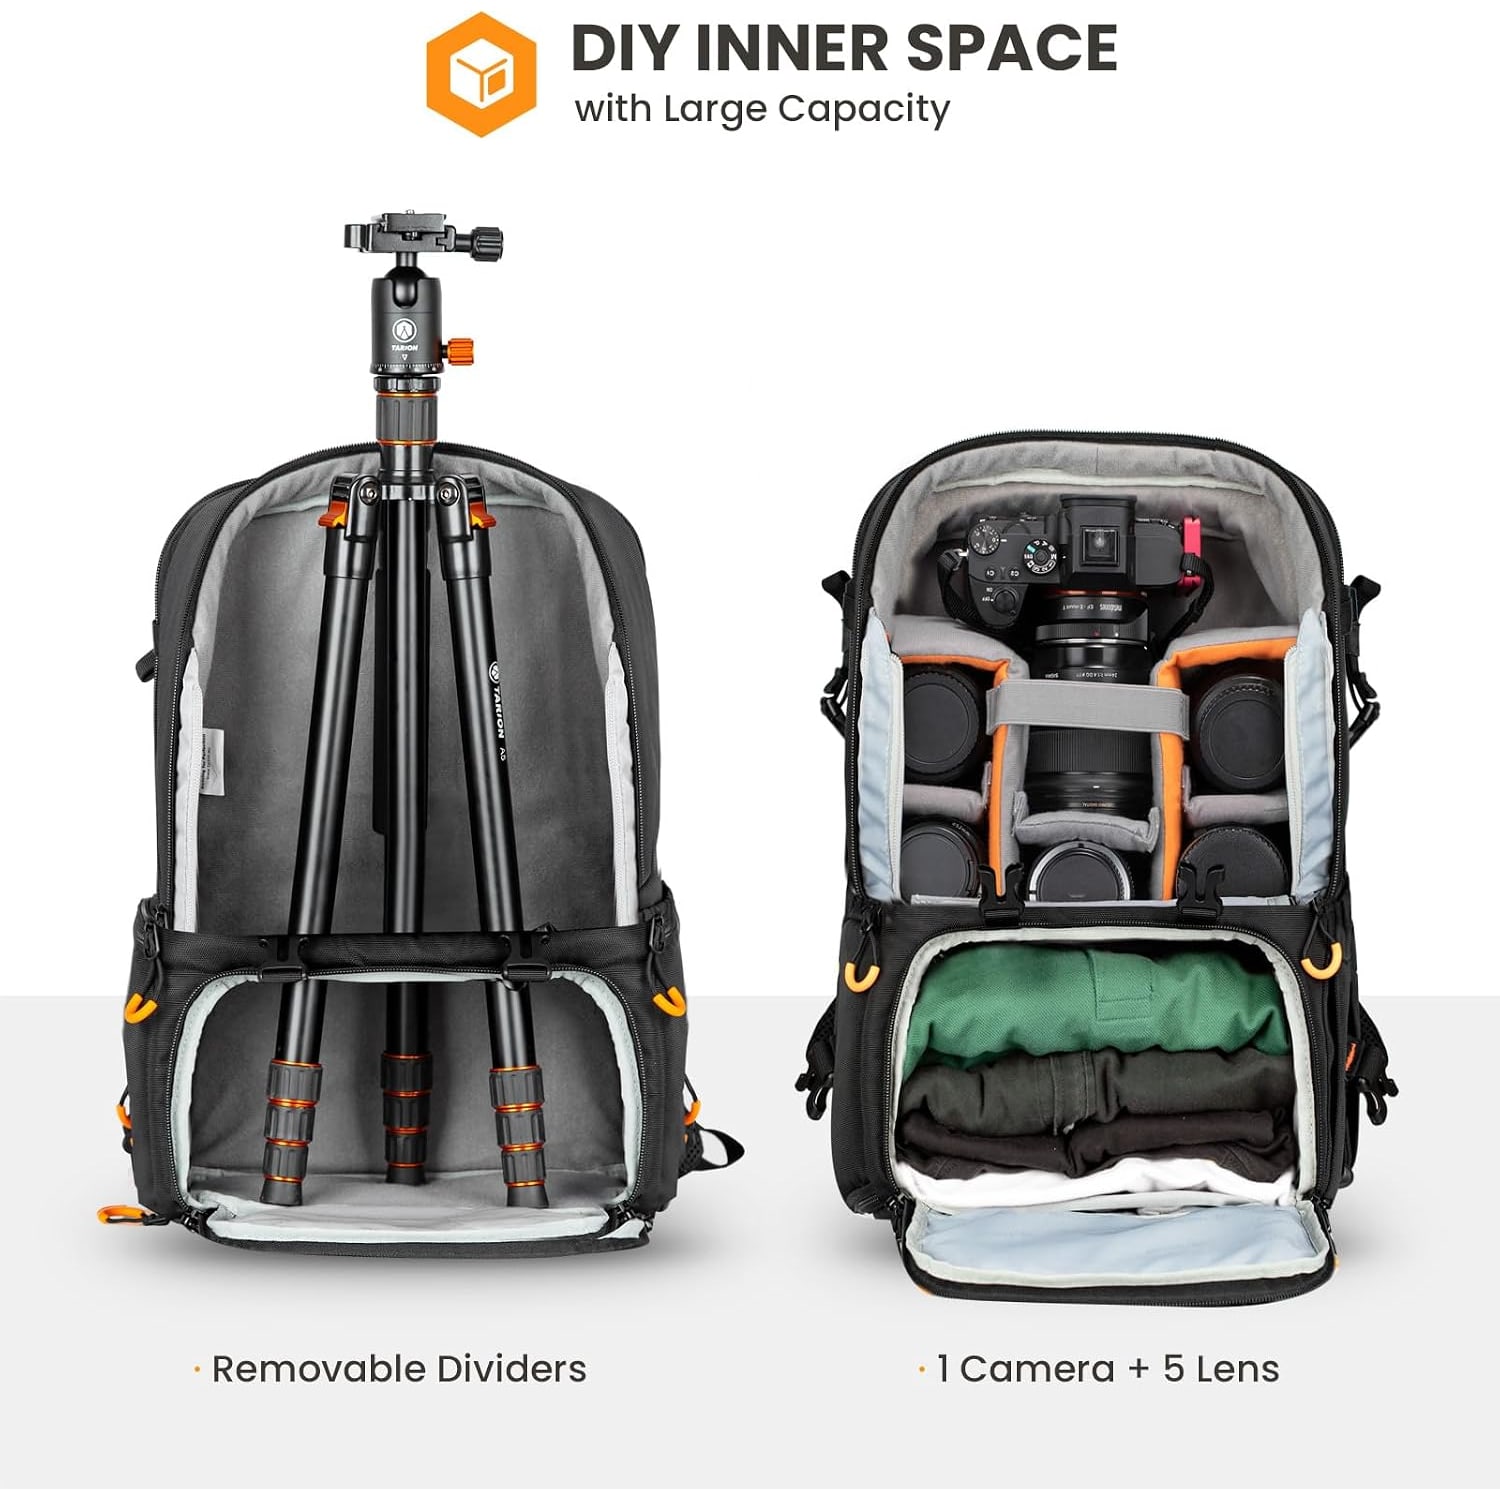
For camera gear, that usually translates to a body with a lens mounted, several more lenses, and the small stuff: batteries, cards, filters, a cleaning cloth, a cable or two. The maker describes two layouts, 2 DSLR cameras and 6 lenses, or 1 camera, 5 lenses and a handheld stabilizer, depending on how you set the dividers. If you shoot with a long telephoto, measure it before you buy. A 15 litre pack is not where a 400mm lens lives.
What 15 litres gives you in return is restraint. A bigger bag gets filled, and a filled bag gets heavy. Photographers who switch down to a compact pack often find they shoot more, simply because they are less worn out by lunchtime.
Why side access matters more than it sounds
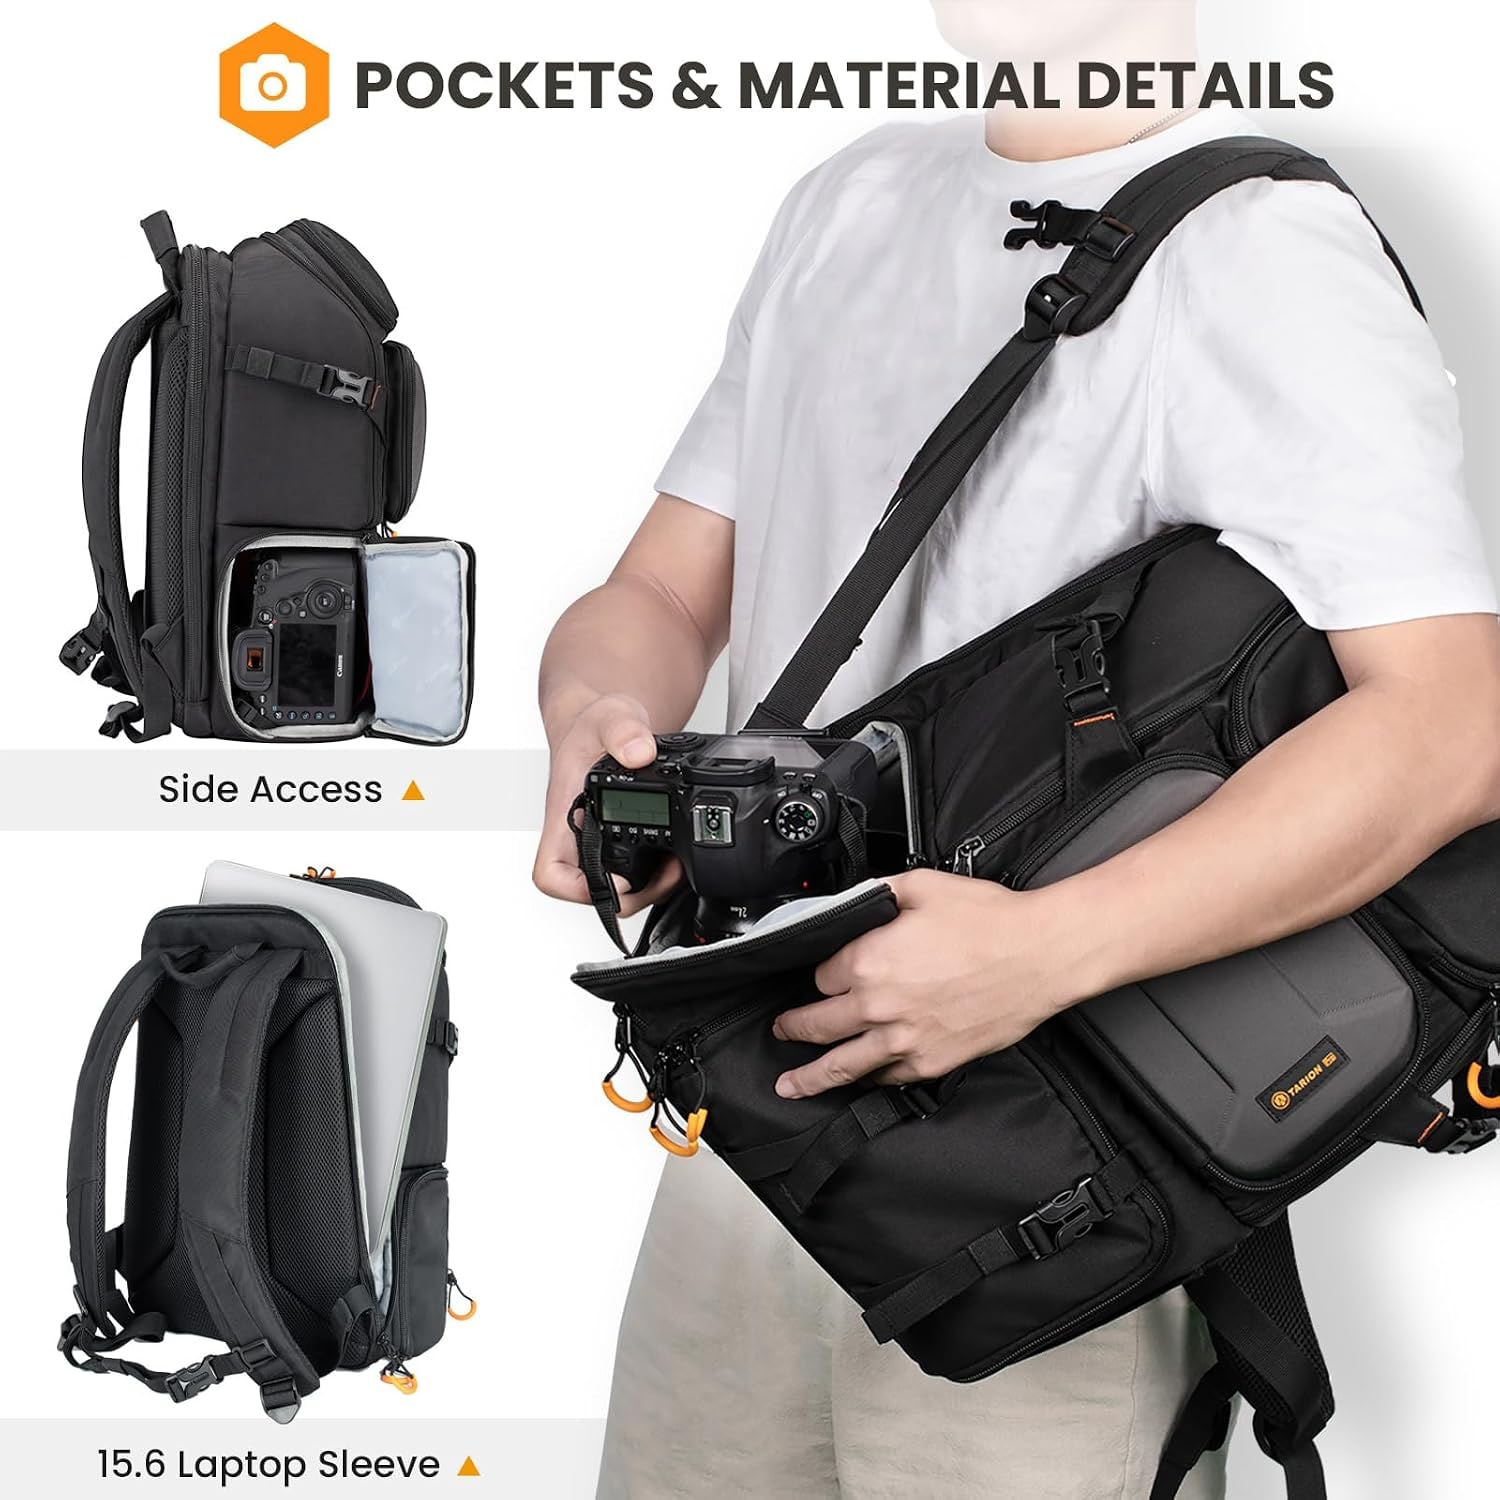
The side-access panel is the single feature that changes how you use a bag day to day. Without it, every lens change is a small ritual. Stop, take the pack off, find somewhere clean to put it, open the main compartment, swap, close, lift, re-adjust straps, walk on. Do that eight times on a hike and you have lost real time.
With a side panel, you loosen one shoulder strap, swing the bag around to your front, unzip, and reach in. The pack never touches the ground. Your hands stay free of grit. On a crowded street you are not holding your gear open at waist height for everyone to see. It sounds minor on paper. In use it is the difference between a bag you tolerate and one you reach for.
The main compartment still opens for proper packing at the start of the day. Think of the side as the working door and the main opening as the loading door.
Protection without the bulk
Inside, the main compartment has thickened padding and an EPE cotton lining. The dividers are padded and movable, which is the standard and still the best way to build a camera interior. You place your largest item first, then wall it off with dividers until each piece has a slot that holds it gently.
The point of individual slots is not just cushioning against drops. It is stopping gear from rubbing against gear. A lens barrel sliding against a camera body for two hours on a bumpy track does slow, quiet damage to finishes and mounts. Firm dividers stop the movement before it starts.
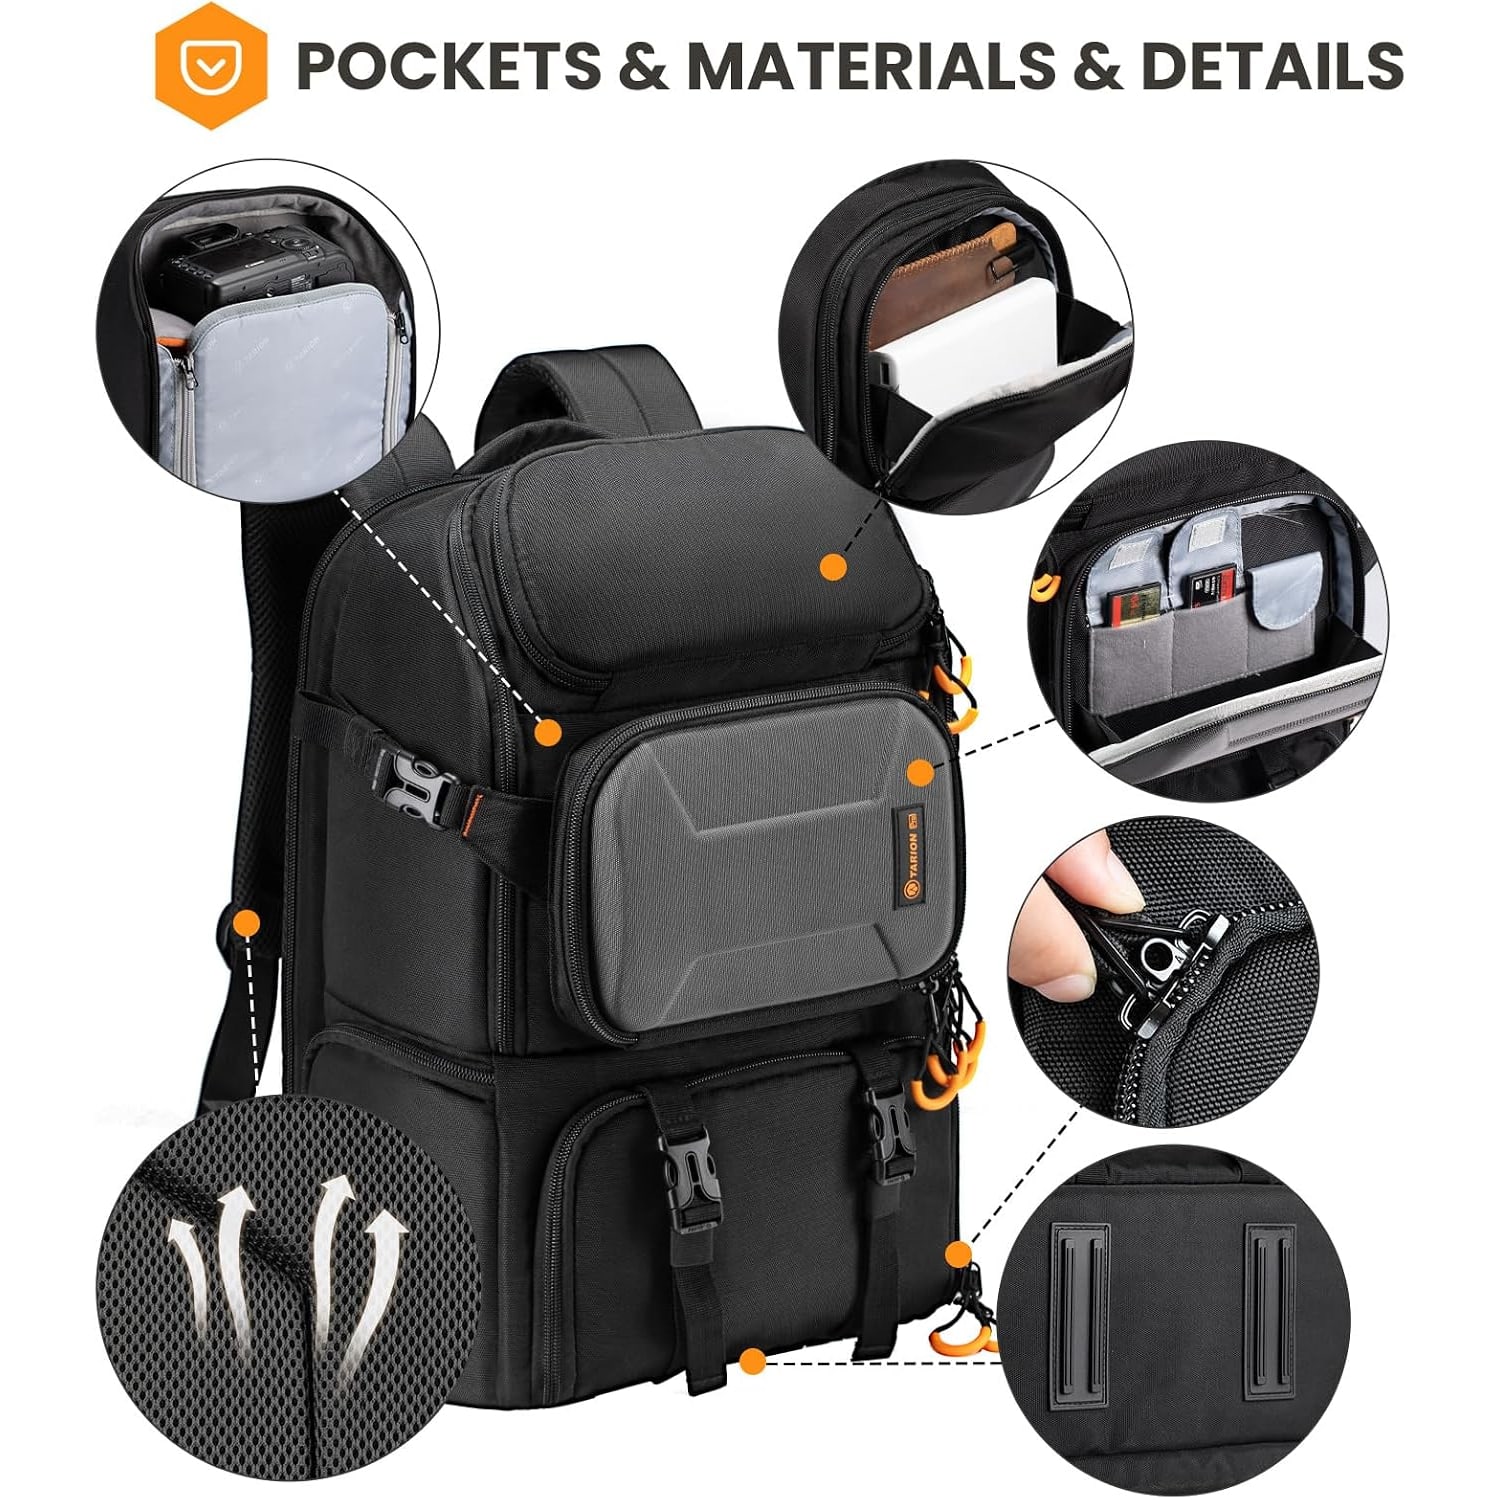
The outer shell is nylon with a soft shell build, and the maker describes it as high-density, anti-tear and abrasion resistant. Soft shell means the bag flexes and compresses a little, which is more comfortable to wear than a rigid case and lets you squeeze it under a seat. It also means you should still treat it with care. This is a bag for walking, travel and transit, not a case to check into airline cargo.
Weather, and what waterproof really means
The maker gives the pack a waterproof water resistance level and ships it with a separate rain cover. Those two things do different jobs and it is worth knowing which is which.
The shell is the everyday layer. The maker describes it as high-density nylon and gives its water resistance level as waterproof.
The rain cover handles the rest. Sustained rain eventually finds zipper lines and seams on any soft bag, and the cover is a simple outer barrier that sidesteps that entirely. It also keeps fine dust out on dry dirt roads, which is arguably the more common problem for camera gear. Pull it on, cinch it, carry on. When it stops, take it off and let it dry fully before stowing it, because a damp cover folded into a warm bag is how you grow mildew.
Carrying comfort
A camera pack carries differently from a hiking pack, because the weight is dense and concentrated rather than soft and spread out. The two things that matter most are how close the load sits to your back and how well the straps spread it across your shoulders.
This pack uses adjustable shoulder straps and a padded air mesh rear panel. The maker says the mesh increases airflow to cut down on sweat. The laptop sleeve sits at the rear, closest to your body, which is the correct place for the heaviest flat item.
Adjust the straps so the body of the bag sits high on your back, with the top roughly level with your shoulders. A pack that hangs low pulls you backwards and makes every step harder. Most people wear their packs too loose. Tighten by an inch and the same load feels lighter.
At 1.45 kg (3.2 lbs) empty, the bag is not adding much before you even start packing.
Who this suits
It suits someone who shoots while moving. Landscape photographers walking to a viewpoint, travellers carrying a body and two or three lenses, event shooters who need a laptop with them, anyone commuting with a camera and wanting one bag instead of two. The 15.6 inch laptop sleeve means it doubles as a work bag, and the plain black exterior does not announce what is inside.
It suits less well if you carry long telephoto glass, lighting stands or multiple bodies with grips. Those kits want more volume. If you are regularly carrying overnight clothing alongside gear, you will also want to size up.
Setting it up properly
Spend ten minutes on the first configuration and it pays off every time you pack. Empty the bag, lay it flat, and take all the dividers out. Put your body with its most-used lens attached in first, ideally where the side-access panel reaches it, because that is the piece you will grab most often. Build walls around it.
Then work outward, largest to smallest. Leave each lens standing upright if height allows, since vertical slots use space better than lying things flat. Keep batteries and cards in a utility pocket so you are not digging through the padded section for them. Water goes in the external bottle pocket, never inside with your electronics.
Looking after it
Care is simple. Hand wash only. Empty everything, shake out the grit that collects in corners, then wipe the outer with a damp cloth and a little mild soap. Air dry it out of direct heat and sun. Never put it in a washing machine or dryer, and skip bleach and ironing entirely.
If it gets properly soaked, open every zipper, pull the dividers out and let the whole thing dry naturally with air moving around it. Heat sources warp padding and can affect the fabric finish. Store it somewhere dry with the zippers slightly open so air circulates.
The short version
This is a 15 litre camera backpack that does the practical things well. Padded, movable dividers across nine compartments so your kit sits where you want it. A side panel so you can reach a lens without putting the bag down. A rear sleeve for a 15.6 inch laptop. Tripod carry on the outside, a water bottle pocket, a nylon soft shell and an included rain cover for when the weather turns.
It weighs 1.45 kg (3.2 lbs) empty and measures 5.7 by 11 by 16 inches, which keeps it compact enough for daily use and travel. If your kit is a body or two, a handful of lenses and a laptop, this is the right size. If you carry long glass or overnight gear, look larger. Measure your longest lens, pack it at home before your first trip, and you will know within five minutes whether it is the pack for you.